Understanding the Key Parts of a Timber Roof Structure
When you hear “timber roof structure essential components explained,” the image that often pops up is a complex framework of beams and boards. In reality, the system is a series of relatively straightforward members, each with a clear job. Whether you’re a DIY enthusiast, a budding architect, or just curious about how a wooden roof stays upright, breaking down the main elements makes the whole concept far less intimidating.
Rafters: The Backbone of Slope
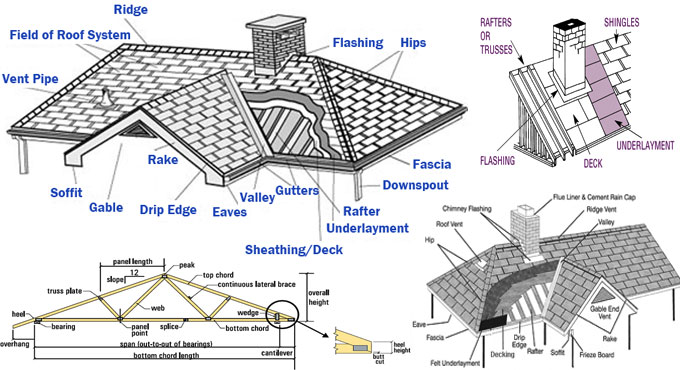
Rafters run from the ridge— the highest point of the roof—down to the wall plate. They carry the weight of the roof covering, any insulation, and the occasional snow load. In most traditional houses, rafters are spaced 600 mm to 800 mm apart, a rhythm that balances strength with material efficiency.
Typical timber choices include seasoned spruce, pine, or Douglas fir. These woods offer a good strength‑to‑weight ratio, and they’re easy to work with on site. When cutting rafters, the “bird’s‑mouth” notch at the base ensures a snug fit on the wall plate, helping to transfer loads cleanly into the walls.
Purlins and Battens: Supporting the Deck
Once the rafters are in place, purlins—horizontal members that run perpendicular to the rafters—provide a solid platform for the roof deck. In smaller spans, the decking itself can double as the purlin, but larger roofs often need separate timber purlins to prevent sagging.
On top of the purlins, thin battens are laid out before the final roofing material is installed. They create a gap for ventilation and allow tiles, shingles, or metal sheets to be fastened securely. Using treated timber for battens is advisable in damp climates, as it resists rot better than untreated wood.
Trusses: Engineered Simplicity
Modern timber roofs frequently rely on prefabricated trusses. A truss is essentially a pre‑assembled triangle of timber, designed to spread loads evenly across a wide span without the need for interior load‑bearing walls. The most common type is the “King Post” truss, where a central vertical post connects the ridge to the tie beam at the base.
Because trusses are engineered for specific spans and loads, they can be lighter than a traditional rafter system while still meeting building codes. Their factory precision also reduces on‑site labor, which is a big win for tight project timelines.
Wall Plate and Ridge Beam: Connecting Points
The wall plate sits atop the top plate of the wall framing, providing a level surface for the rafters or trusses to rest on. It spreads the roof load evenly across the wall studs, preventing localized crushing.
At the opposite end of the roof, the ridge beam (or ridge board, depending on design) runs along the roof’s apex. In a simple pitched roof, the ridge board acts as a nailing surface for the rafters. In larger, more complex roofs, a full‑sized ridge beam may be required to carry substantial loads and to anchor bracing members.
Collar Ties and Bracing: Keeping Everything Rigid
Collar ties are short, horizontal members that connect opposing rafters about a third of the way down from the ridge. They prevent the rafters from spreading apart under wind uplift, which is especially important in open‑plan designs where interior walls cannot act as bracing.
Additional diagonal bracing, often made from timber or metal straps, can be installed between the wall plate and rafters or between purlins. This triangulation adds stiffness and reduces the risk of racking during storms.
Insulation and Ventilation: The Hidden Layers
While not structural in the strict sense, insulation and ventilation layers are integral to a roof’s long‑term performance. Between the rafters, mineral wool or rigid foam boards provide thermal resistance, while a continuous air gap—usually achieved with breathable under‑layment and strategically placed vent strips—lets moisture escape.
Neglecting these layers can lead to condensation, wood rot, or reduced energy efficiency. In timber roofs, allowing the wood to “breathe” is as important as keeping it structurally sound.
Typical Material Choices and Sustainability
- Softwood (spruce, pine, fir): Most common for residential roofs; easy to source and work with.
- Hardwood (oak, ash): Used for high‑traffic areas or decorative exposed beams; more expensive but very durable.
- Engineered timber (glulam, LVL): Offers superior strength for longer spans while using less material.
- Reclaimed timber: Growing in popularity for eco‑friendly builds; requires careful inspection for hidden defects.
Common Mistakes to Avoid
Even seasoned builders can trip up on a timber roof. Over‑spanning rafters without adequate support, using untreated wood in damp environments, or skipping collar ties are frequent errors. Another subtle pitfall is ignoring differential movement—wood expands and contracts with humidity, so leaving a small gap at the ridge board can prevent unwanted pressure on the ends.
FAQ
What’s the difference between a ridge board and a ridge beam?
A ridge board is a non‑structural, flat piece that simply ties the tops of rafters together. A ridge beam, however, is a load‑bearing member that can support roof loads and may require its own supports or columns.
Can I use metal brackets instead of traditional wood joinery?
Yes, metal connectors like hurricane ties or joist hangers can reinforce connections, especially in high‑wind zones. They don’t replace the need for proper timber sizing, but they add an extra layer of safety.
How often should timber roof components be inspected?
A visual check at least once a year—preferably after heavy storms—helps spot early signs of rot, insect damage, or loose fasteners. If you notice sagging or creaking, it’s wise to call a professional for a more thorough assessment.


![5 Timber Roof Structures Explained! [2026] - Structural Basics](https://www.structuralbasics.com/wp-content/uploads/2022/08/Rafter-roof-2048x1188.png)