How to Master Adobe After Effects CS6: A Beginner’s Guide
If you’ve just installed Adobe After Effects CS6 and feel a little overwhelmed by the sea of panels, timelines, and effects, you’re not alone. This guide walks you through the basics, from setting up the workspace to creating a simple motion graphic, without drowning you in jargon.
Getting Started: Installation and First‑Run Settings
Before you dive into keyframes, make sure the software runs smoothly. After launching CS6, the program asks whether you want to use the default workspace. Choose “Standard” for now; you can customize later. Then, head to Edit → Preferences → General and enable “Auto‑save” with a 10‑minute interval. This tiny habit saves countless headaches when a crash occurs.
Interface Overview: What You See and Why It Matters
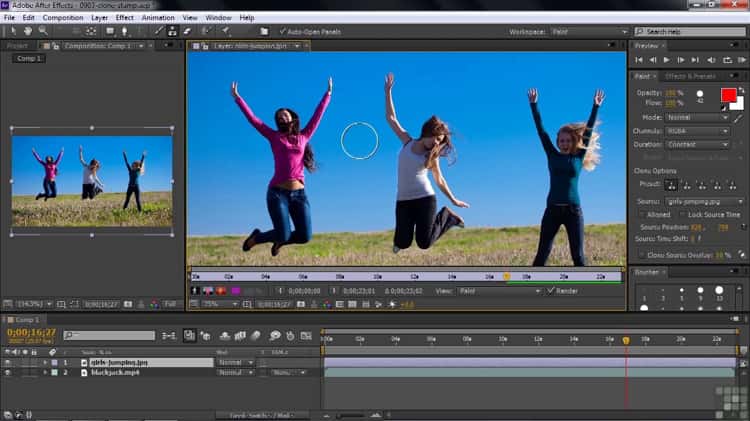
The After Effects window is divided into several regions, each with a purpose:
- Project panel – where you import footage, audio, and stills.
- Composition panel – the visual preview of your work.
- Timeline – the backbone for arranging layers and animating properties.
- Tools bar – quick access to selection, hand, zoom, and the pen tool.
- Effects & Presets – a searchable library of filters and animations.
Resizing these panels is as easy as dragging their borders. As a beginner, keep the Project and Timeline panels visible; they’ll be your go‑to spots for most tasks.
Essential Tools for Beginners
Not every effect or expression is necessary right away. Focus on the core tools that let you move, scale, and fade objects.
- Selection Tool (V) – pick and reposition layers.
- Anchor Point (A) – defines the pivot for rotations and scaling.
- Position (P), Scale (S), Rotation (R) – the three fundamental transform properties.
- Opacity (T) – controls transparency; handy for fades.
- Pen Tool (G) – draws masks, which you’ll use to reveal or hide parts of a layer.
Remember: hitting the shortcut key after selecting a layer instantly opens the corresponding property in the timeline. This shortcut‑first mindset speeds up every project.
First Simple Animation: Moving Text Across the Screen
Let’s create a basic title animation to cement the concepts above.
- New Composition: Click Composition → New Composition. Set 1920×1080, 30 fps, and a 5‑second duration.
- Add Text: Select the Text tool (Cmd/Ctrl + T), click inside the Composition panel, and type “Welcome”.
- Set Initial Position: With the text layer selected, press “P”. Click the stopwatch next to Position to create the first keyframe at the 0‑second mark. Drag the text off‑screen to the left.
- Create Motion: Move the timeline cursor to 2 seconds, then drag the text back to the center. A second keyframe appears automatically.
- Ease the Movement: Right‑click the second keyframe, choose Keyframe Assistant → Easy Ease. This adds a subtle acceleration and deceleration, making the motion feel natural.
- Fade In: Press “T” for Opacity, set a keyframe at 0% at the start, and another at 100% at 0.5 seconds. The text now fades while it slides.
Press the spacebar to preview. If the motion looks jerky, select both Position keyframes, right‑click, and choose “Spatial Interpolation → Linear” to smooth the path.
Tips for a Smooth Workflow
Even in a beginner’s stage, a few habits keep your projects tidy and your mind clear.
- Rename layers as soon as you create them. “Title_Text” beats “Layer 1” when you later search the timeline.
- Use pre‑compositions to group related layers. This isolates complex effects and prevents accidental edits.
- Leverage the “Render Queue” for final output. Choose “Adobe Media Encoder” for a broader range of formats.
- Keyboard shortcuts are your friends. Spend a few minutes each week memorizing one new shortcut; the time saved adds up quickly.
- Stay organized by creating a dedicated folder for each project within the Project panel. Drag imported files into these folders to avoid a cluttered workspace.
Common Mistakes to Avoid
Beginners often fall into these traps:
- Relying on default resolutions for all projects. Always match your composition settings to the intended delivery platform—social media, broadcast, or web.
- Applying effects directly to source footage. Instead, duplicate the layer or pre‑compose, preserving the original file for future edits.
- Neglecting RAM previews. Press “0” on the numeric keypad to generate a quick preview; this catches timing issues early.
FAQ
Q: Can I use After Effects CS6 on a modern Mac or Windows PC?
A: Yes, as long as your system meets the minimum specs listed in the CS6 documentation—generally a 64‑bit OS, 4 GB RAM (8 GB recommended), and a graphics card supporting OpenGL 2.0 or later.
Q: How do I export a video that’s ready for YouTube?
A: Add your composition to the Render Queue, choose “H.264” under Output Module (via Adobe Media Encoder), set the bitrate to around 8–12 Mbps for 1080p, and click “Render”.
Q: Is it possible to animate 3D objects in CS6?
A: CS6 introduced basic 3D layer support, but for true 3D modeling you’ll need a companion program like Cinema 4D Lite, which ships with After Effects.
Q: What’s the best way to learn expressions?
A: Start with simple ones like “wiggle(2,30)” to add random motion, then explore Adobe’s official expression guide. Experimentation is key; copy a line, paste it on a property, and watch the effect.